There’s something magical about transforming older furniture with paint.
 An old table like this wood one could easily be passed over in any store, as it was definitely a wallflower when I spotted it among other furniture at a Habitat for Humanity ReStore.

But I saw potential in the turned legs and the fun shaped supports for the top. A functional piece that could easily stow books or toys in a living room without compromising its ability to offer a sturdy spot for my coffee, book, or remote controller.
The plain, unremarkable top felt like it needed a little pizazz, and I immediately envisioned a pattern in gold and greens.
This is the transformation story of one little brown table into a serious interior design moment, complete with a bit of unusual trim. And with the quick dry time of Krylon® ColorMaster® Paint + Primer, it only took a few hours to complete.

For this project I chose Krylon ColorMaster Paint + Primer in Brilliant Gold, Satin Sea Glass, and Satin Italian Olive. I used the new Krylon ColorMaster Paint + Primer-25% More because you are able to use less cans to get your projects done. These new cans are available at your local Walmart and are great for larger projects.
I also used a Krylon Copper Leafing Pen that I had in my collection at home, to amp up the details on the table.

The first step to this makeover is sanding. The wood had a bit of a finish on it, and some beauty marks, so I ran an oscillating sander over the edges.

And since the top will both be well-used and become the statement of the piece, I sanded the top a bit, too.

The next step is wiping off the table to remove any dust from sanding, so it is ready for paint. My little paint cans are standing at attention at-the-ready.

I like to take a moment during the process to meditate on the design. Measuring the top to make sure my plan for a pattern is truly what the mojo is telling me is a good way to solidify plans. And, it’s a good point in the project to read the safety and application instructions on the label before spray painting.

Even thought I don’t need to prime the top for the paint to have a good finish, I primed it anyway. I just want to be sure it will have the best finish and adhesion possible.

This is my first time using ColorMaster Paint + Primer in Italian Olive. It’s an earthy green color, and I’m loving how it’s a meditative neutral. Perfect companion to my usual bright pops of color that I love dearly.

Since the top is the major moment of the piece, I started with painting the bottom in ColorMaster Paint + Primer in Satin Sea Glass green. Making sure to get all of the angles and details of the turned legs takes a few passes in several different angles. The ColorMaster Paint + Primer – 25% More was perfect for this task with its spray any way application, which allowed me to spray the project from many angles including upright, from the side or upside down, always getting an even spray pattern and coverage. I dusted the table about 10 times with very light coats, just to be sure the coverage was perfect. I used more than one can to paint the bottom and inside of the table.

Now that the bottom is dry, I wrap it in newspaper and painter’s tape. It’s time to paint the pattern on the top.

The next step is measuring and marking the top for the pattern.

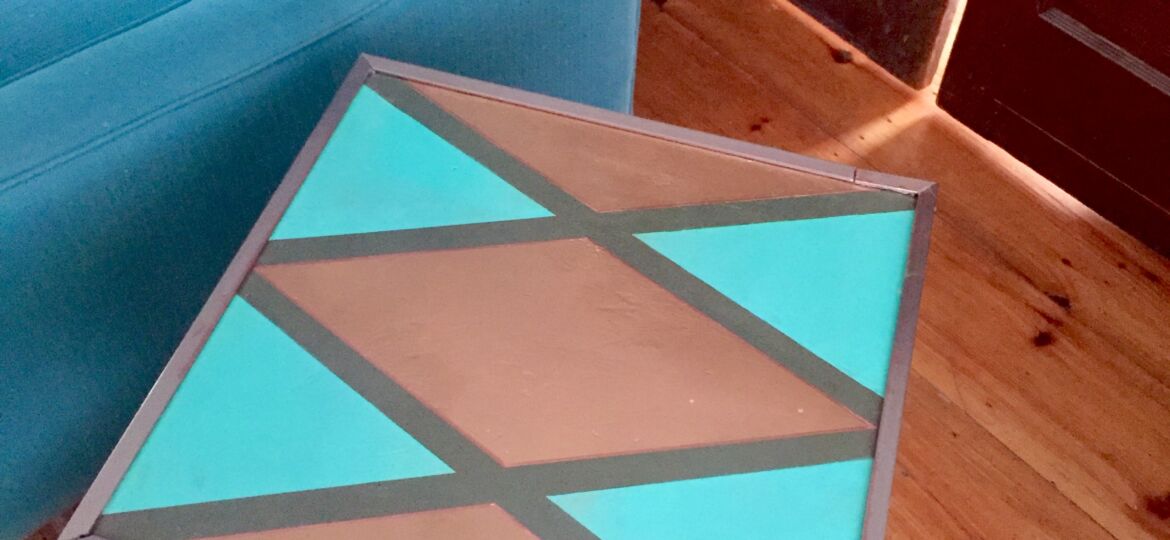
I decided to make a diamond pattern, so I measured the halfway point on the top and ran the painter’s tape to that spot from the two opposite corners.

Then I repeat the process for the other side. The Italian Olive will be the color of the lines between the diamonds.

I fill in the diamonds with painter’s tape that will be ColorMaster Paint + Primer in Sea Glass, so I can paint the other diamonds Brilliant Gold. It takes about 4 light coats to match the top of the paint can.

The gold diamonds are making me very happy, even with the painter’s tape still on.
 After the gold paint is fully dry, I cover those diamonds and paint the rest in ColorMaster Paint + Primer in Sea Glass. Again, it takes about 4 light coats to match the top of the paint can.

The paint is finished and the table is ready to use. It took about 3 hours to complete, and just one can of ColorMaster Brilliant Gold and ColorMaster Italian Olive and two cans of ColorMaster Sea Glass. The little table looks very smart in Sea Glass, even without the pattern pop on top.

After the paint is dry, I add in detail on the legs with the Krylon Copper Leafing Pen. I’m inspired to create more art with this pen. It is really easy to work with.

I’m very happy with how it looks in the living room, but it feels like it could use a little extra metallic embellishment.

I picked up tile edging profile for tile while I was at the Habitat ReStore, and after cutting and gluing it around the edges of the table, I’m thrilled with how this little wood table now looks like a showstopper in my living room.

It’s amazing what a little bit of Krylon spray paint and an afternoon can create.

Note: Krylon has provided me with some of the products used in this project. I was also compensated for my time and this blog post. All opinions and positions expressed here are my own and do not necessarily reflect those of Krylon. For more information about painting projects, please check out Krylon online.