We love our compost bin.
A compost bin is an easy-to-build project that we think does a lot for our family. Whether you’re looking for ways to be green or you want dialed-in dirt for your daylilies this is a project we use just about every day. Here’s how we built it.
Materials
We used twelve 2x6x8 Western Red Cedar boards. The materials is naturally rot resistant and chemical-free. Plus it looks great. We fastened everything together with 3-inch and 2 1/2-inch coated deck screws.
Cut The Pieces
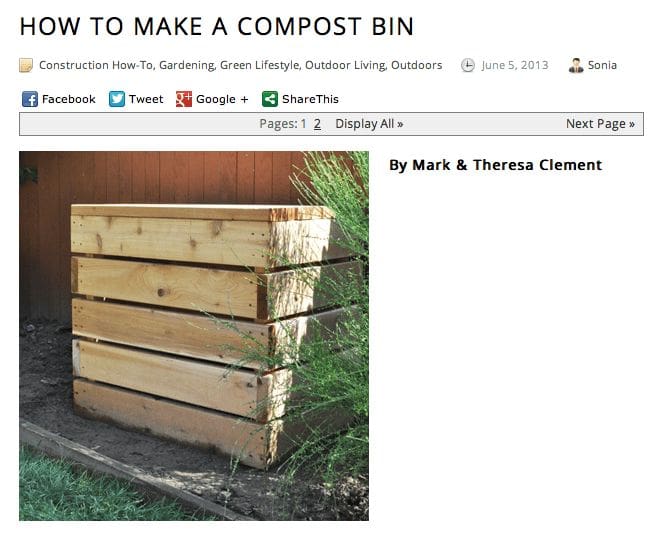
Our compost bin is five individual boxes stacked together with a 3/4-inch gap in between. Each box has an outside dimension of 36-inches by 24-inches. To make that work, cut the front and back pieces 36 inches and the side pieces 21-inches. We added a little detail that makes our bin less boxy by alternating each box’s end-grain, lending a pleasing “box-joint” look to it.
Next, cut the staves. The staves are the vertical supports that hold the individual boxes together. We ripped a 2×6 in half on the table saw, then cut them to length (30 3/4 inches).
The top is 4 pieces of 2×6 at 36-inches and held together by two 2×6 struts cut at 20 3/4-inches. We fastened these from the bottom with the 2 1/2-inch screws to prevent them from popping through the top like the 3-inchers would.
Assemble The Pieces
Assemble the boxes and, before driving all the screws tight, make sure the box is as square as possible then send the screws home. Next, fasten a stave in each corner as square as possible to the body of your bottom box.
Add the next box. Use 1-by spacers on each corner to gauge accurate spacing and fasten. Keep adding boxes and spacers. For a little custom detail, alternate the positions of the cedar’s end-grain for a box-joint look.
Assemble the lid. Again, use spacers. Hold it all together with the 2×6 struts and be careful not to overdrive the screws so they poke through. We used 2 1/2-inch screws here.
Find a nice spot for the compost bin, set the box level, and happy composting.

