Note: This is a sponsored post. The Original Super Glue asked us to try Total Tech in a project. The project is my creation and the opinions and instructions are mine.
We’ve been living with an undersized frame photograph on our living room wall for about 18 months. Yes, I’m a professional home designer who sits in that room on the daily and have neglected addressing a prominent wall in our home. It’s been eating at me the entire time, and I’ve envisioned creating a dramatic custom wall art piece to fill the space. So I am grateful for The Original Super Glue for asking us to try out their Total Tech all-in-one adhesive and sealant.
It gave me the excuse to create this wall art for our home. And I’m beyond thrilled with the results. Plus, my family is happy about the art, too.
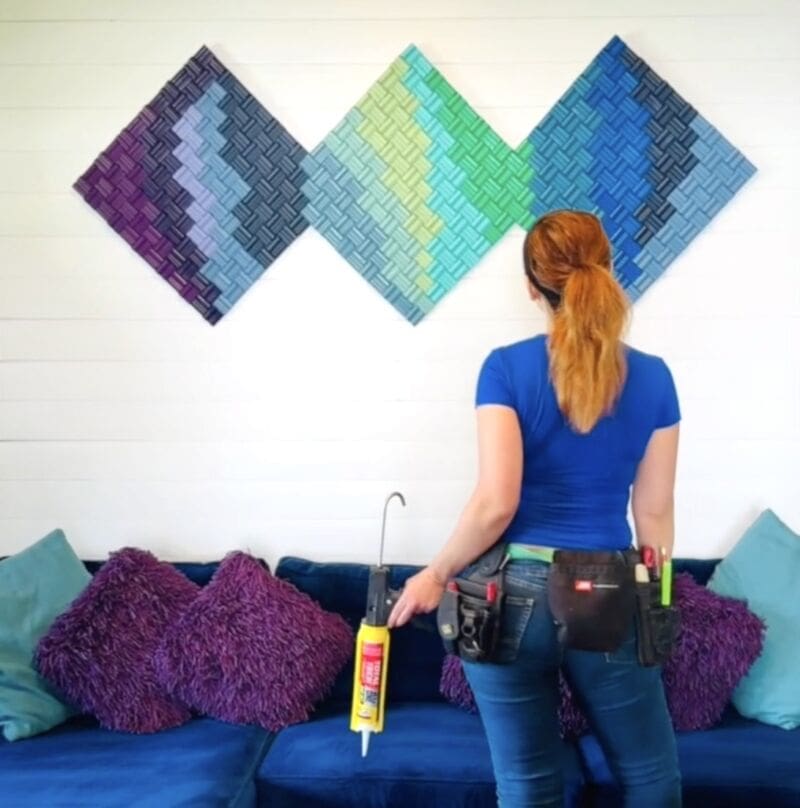
I’ve made wall art from chair rail before, and I loved how it looked. That piece is at my mom’s apartment, and I’ve wanted to create a larger and more colorful version. So for this wall art project, I set out to create a more complicated shape with smaller pieces and more colors.
Layout the size and shape of the wall art backer.
The first step for this wall art project involves deciding on the size and shape of the wall art. I measured the wall space above our sofa and then used that as the framework in which to decide on the actual dimensions and shape of the final piece.
Since most everything in our living room is rectangular, I decided that we needed to turn the rectangle on its side and create a series of intersecting diamonds for this art. And since it is a commanding artwork, it needed some space on either side to let it breathe a little. So I made sure we left at least 18 inches on either side of blank wall space.
Using my tape measure, pencil, square, and level as a straight edge, I marked the shape on a piece of plywood.
Cut the plywood backer to size.
After marking the shape, I used a circular saw to cut the plywood. When cutting plywood with a circular saw, always make sure the sheet material is supported underneath. For example, I put the plywood sheet on top of three 2x4s that rested longways across sawhorses. With this support, the plywood sheet would not drop while cutting it.
Cut the chair rail to size.
After the backer was cut, I set up a miter saw on my work surface. Since I wanted the artwork to be easy to fit, I measured the height of the chair rail and then set a block on the miter saw cut surface so that each cut block was a square. It took about 500 blocks to make this wall art, so I needed to cut about 8 pieces of chair rail.
Sand each block.
After cutting all of the blocks, I sanded the edges of each so that the blocks would fit together tightly when laid out in a pattern. It can be painstaking to sand 500 blocks by hand, but I find that I notice any small imperfections in each block more carefully and can address those more intentionally while hand sanding. It also gives me time to listen to an audio book.
Paint each block.
I love color, so choosing the colors for this artwork was pleasantly enjoyable. I’ve been a certified color expert for about a decade, and I often reach into my color education when choosing a color story (or scheme). For this I wanted to help unify the colors we already chose for our living room so I chose an analogous color scheme—colors that are next to each other on the color wheel.
Use construction adhesive to attach each block.
After the paint was dry, it was time to adhere the blocks to the plywood backer. But first, I laid out the blocks in a pattern so I could make sure the pattern was pleasing to me and my family. With all of us happy with the look, I started affixing the blocks with Total Tech.
The tip of the Total Tech tube needs to be cut with a utility knife, much like a tube of caulk. And I used my caulk gun to apply the construction adhesive to each block. During the course of adhering 500 blocks, there wasn’t a single drip and it was very easy to use.
Prep the wall art for mounting.
I let the Total Tech cure overnight, and then I attached a series of three French cleats to the back of the wall art. This allowed me to mount the wall art without having any visible fasteners.
Enjoy the wall art.
The last step is a delight. Now that we have custom wall art that suits our living room, I’m delighted. And my family has kindly complimented the design, too.
If you plan to make wall art like this, and have any questions, please feel free to comment below. I’d be delighted to help.


