Use fire to upcycle cookie tins into a flower water fountain!

2016_MyFixitUpLife_Bernzomatic_Fountain_After_9

Fire helped us repurpose cookie tins into a flower water fountain.

2016_MyFixitUpLife_Bernzomatic_water Fountain_After_14

In search of objects for creating a flower water fountain for our front porch, we found a collection of Christmas cookie tins priced at 50 cents each at our local Habitat for Humanity ReStore.

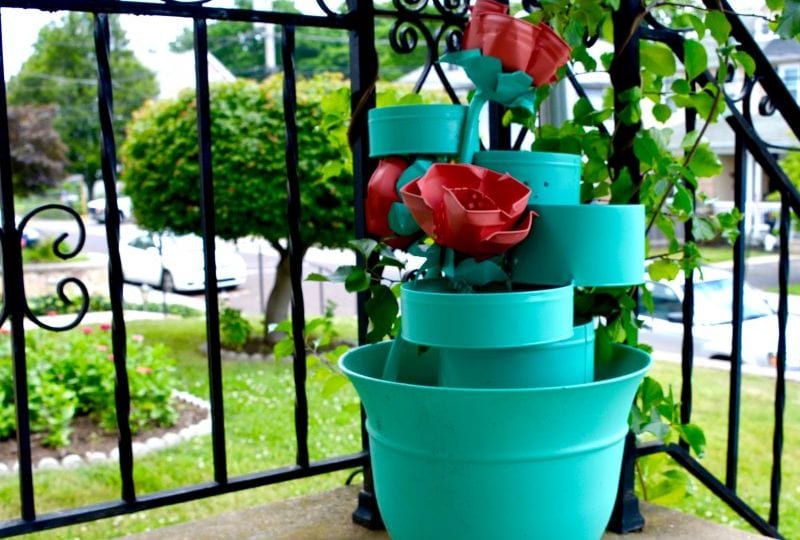
While the connection might not be apparent to everyone else, I was inspired immediately to create a layering effect, building the tins one-by-one on top of each other, so the water could flow from tin to tin.

The DIY part. Mark and I needed to use our Bernzomatic torches and brazing rods to connect the steel cookie tins. A good way to check if you do this project is with a refrigerator magnet. If it sticks, you’ve got steel. To make all the pieces a single sculpture, we brazed them. Using Bernzomatic’s map gas (the yellow canister) and the awesomely awesome BZ8250HT torch head to make this flower water fountain, the map gas heats the steel enough to melt the brazing rods which forms a really strong connection. It was so much fun!

The design part. I had a vision to paint the tins so they would seem like lily pads. And while we were building the water fountain, and I was looking upon the lids discarded to the side, I was inspired by a vision of Monet’s water lilies. We needed flowers. So I cut and molded the tin lids into flowers that help create the finishing look for the modern industrial interpretation of Monet’s water lilies.


1_2016_MyFixitUpLife_Bernzomatic_Fountain_Before_Spoons and tins from Habitat
Holiday cookie tins from Habitat for Humanity’s ReStore and some old spoons are the materials for our summertime fountain.
4_2016_MyFixitUpLife_Bernzomatic_Fountain_Torch_Brazing
Bernzomatic’s map gas, BZ8250HT torch, and brazing rods for steel make this project possible.


6_2016_MyFixitUpLife_Bernzomatic_Fountain_Mark_Habitat_Tin Can
The cookie tin cascade begins. Tip: A cinder block is a great, easy base for doing torch projects.


11_2016_MyFixitUpLife_Bernzomatic_Fountain_Brazing_Mark_Tin Can_Habitat
We assembled the flower water fountain upside down. We propped pieces on blocks and other supplies to get them parallel to each other.


16_2016_MyFixitUpLife_Bernzomatic_Fountain_Hammer_Setup_tin can
We found keeping the tins stationary helped make the connection, so a non-flammable weight like a hammer or wrench was really helpful keeping the pieces still.


25_2016_MyFixitUpLife_Bernzomatic_Fountain_Primer_Krylon
And now the painting begins. We used Krylon primer for the base coat.


28_2016_MyFixitUpLife_Bernzomatic_Fountain_Krylon_Flowers_Lid_Tin Can_Habitat
I am inspired by leftovers, cut-offs, and other things that seem like they can’t be used. Old lids…nah…New lilies! I cut the lids with my handy Fiskars utility snips that I keep in my tool pouch, then folded the ‘petals’ to create an organic look.


32_2016_MyFixitUpLife_Bernzomatic_Fountain_Mark_Impact Driver_Dewalt_Habitat
A new coat of paint and some 1/4-inch drain holes. The fountain is almost ready.


2016_MyFixitUpLife_Bernzomatic_Fountain_After_15
We ran plastic tubing from a pump in the bottom of the flower pot through the flowers and over some rocks and beads.


Save

Save

Related Posts

Comments (1)

Such a lovely creative fountain! Fantastic idea!

Leave a comment

Verified by MonsterInsights