Finishing a basement is one of those ideal flipper moves to create extra livable square footage in a home, and knowing how to frame a basement is the first step in the process. If you’ve framed a shed or another above-ground space, you are a little bit ahead of the game for basement framing. But, there’s still some nuance to framing basement walls. We recommend reading this article on how to frame basement walls and watching the framing basement walls video before you get started. Then you’ll be ready for framing a basement at your house.
Here’s what you’ll find in this article on how to frame a basement:
Tips for Accuracy, Working Alone, Code Stuff DIYers Ignore
Before we get into how to frame a basement, let’s cover some of what you need to know before framing a basement begins. I can’t tell you how many DIY Facebook group posts I’ve seen of dudes beaming that they just slapped up a basement wall, claiming something like, “I framed my basement!” And while it’s true they did, it’s also abundantly true they not only didn’t get a permit, they don’t know how to get a permit. And framing a basement is a permit-y kind of job.
I’m not trying to be snarky, but something screwed to the floor of your home seems like something that should be done correctly. Maybe I’m off my rocker. Anyway, you’ll learn how to frame basement walls and discover a few carpentry, code, and workflow tips I use or follow when I frame basements in the following.

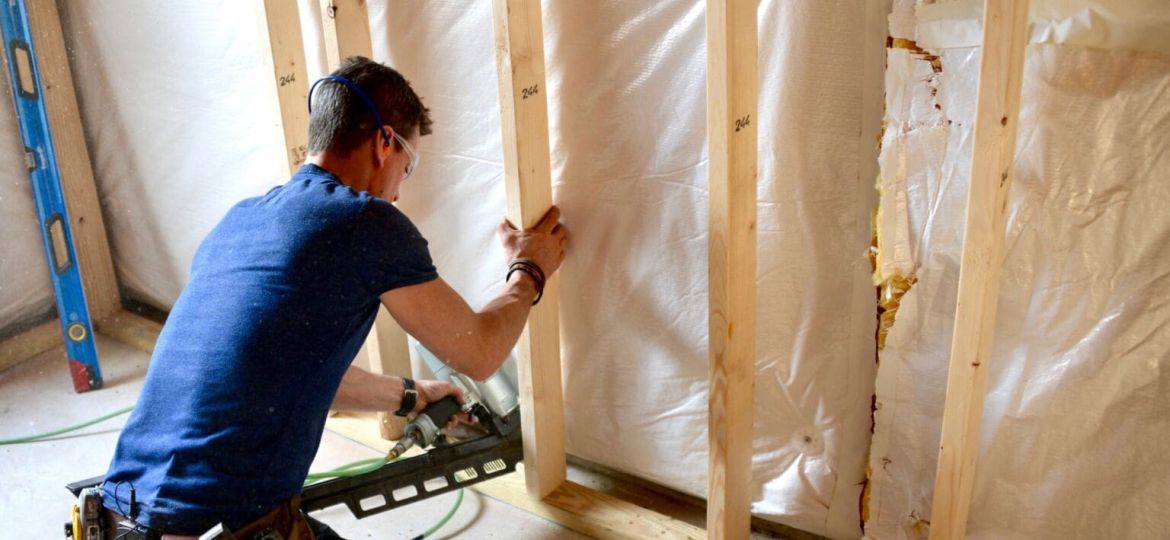
1. Framing Basement Walls: Layout and bottom plate
How to frame basement walls? First, I don’t “tip” walls framing a basement, so I don’t build the on the floor and tip them into place as a single unit, like how a new home is framed. Some people do, but in the houses I work on, it’s sooooo not worth it. Ceiling pipes, lumpy old slabs, beams, HVAC trunks…forget it. Slow is fast here for me. Way more accurate and way fewer mistakes. To put a finer point on it, if you need a sledgehammer to bash your wall into place, you’re doing it wrong.
I use a rotary laser to establish a line describing the front of the plates and studs. The layout cue I’m working from is that I want the back of the studs–the side facing the foundation–to have 1 inch between the two surfaces. I then snap lines and set plates.
Code wants the bottom plate to be pressure treated lumber. So I use a rotary hammer and Spax #10 x 3-inch Multi-Material Screws to set the plate on the line.

2. Framing Basement Walls: Fire blocking
Next, let’s go over “fire stop” or “fire blocking” in a basement wall frame. The name is really a misnomer because it should be Fire-Slower-Downer. All it is is a barrier to hold any fire that begins in the basement for a little longer so people have time to react and get out. The firestorm that is a flames being sucked through unblocked framing is impossible to describe.
All fire stop is is a sheet of 1/2-inch OSB or drywall nailed to the framing above the stud wall. I set it 1/2-inch back from the chalk line so I can see it later for installing the top plate. And by “nailed” I mean “stapled.” I love my narrow crown stapler for this job.
3. Framing Basement Walls: Top plate
The next step in how to frame basement walls: the top plate goes in. To assist me when working alone framing basement walls, I make “hooks” out of 2-by stock or furring strips. It’s a third hand kind of thing.
Then I set a stud on the left side–nice and plumb!
From there I pull my layout.

4. Framing Basement Walls: Installation of studs
Concrete slabs are lumpy. Lumpy enough that all the studs aren’t the same length. Maybe I’m too persnickety, but I want all the studs in my basement framing to fit between the plates.
Side note, I love this Skilsaw sidewinder. Fast, durable, affordable, beastly. There’s a blade-left version, too.
I’m also impatient, so I stack a bunch on my Werner rolling scaffold (it’s a Werner; I love this thing) and measure, cut, place. Then, roll, rinse repeat. It’s more efficient than using ladders when framing a basement.

5. Framing Basement Walls: Code and Fire Stop Notes
The basement framing shown here had a vapor barrier already installed by the builder, awesome. If you’re working on a home that doesn’t have a vapor barrier–and you need one–I install it after the fire stop. Where I work, it’s simple: A drape of 6mm plastic fastened to the fire stop that hangs to the floor.
Since this basement framing required a vertical fire stop every 10-feet between the studs and the foundation, we easily did that by packing Rockwool insulation–my total fave for all insulation–behind the stud.

Do you have any questions about framing a basement? If we haven’t included what you need to know so you know how to frame basement walls at your house, please drop us a note or comment below. We’re always happy to help.
Watch our video series about Basement Remodeling

For the bottom framing, what about putting a layer of plastic or foam below the treated wood / between the concrete to avoid any moisture retainment?
Check with your local building inspector to see if that’s allowed. By the time you jump through all of those hoops, you might as well use treated.