A babysitter gave Jack clay to use on our fabric tufted ottoman, and it gave me a DIY project: reupholster an ottoman.
It’s not hard to reupholster an ottoman and it’s not much harder to reupholster a tufted ottoman. Let me show you how to recover an ottoman in an afternoon. Check out the steps below and watch the videos that show the steps.
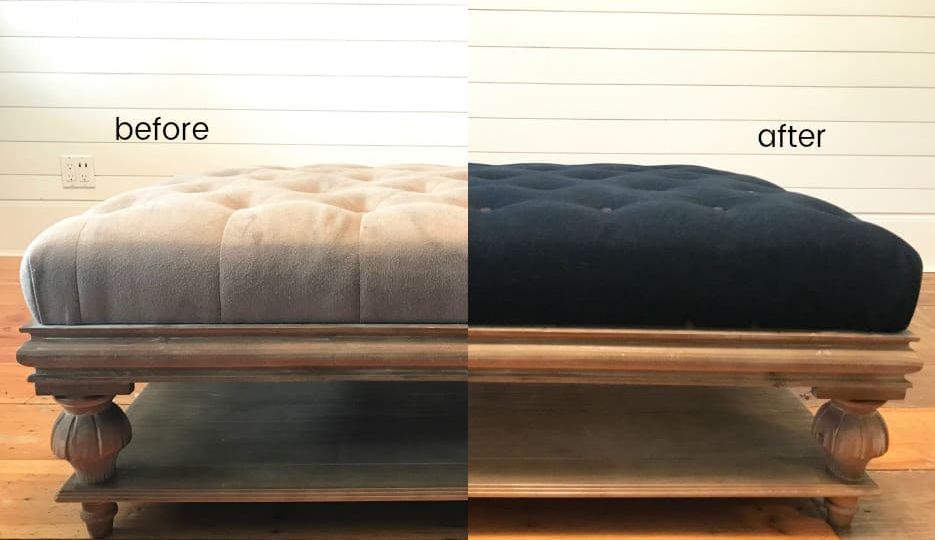
I’ve noticed that I have strong attraction to tufted furniture. Especially, if the tufted furniture has nail-head trim in a classic fabric and turned legs, well, that’s all I need to know to fall in love.
After a search, I found this ottoman with a storage shelf. It has the wood features that Mark is into, and the turned legs and tufting that I’m into. So when shortly after buying it, I came home to find the babysitter and Jack playing with clay on the ottoman, my heart sank.
I didn’t let on how furniturely-devastated I was on the inside when I saw the evidence of the clay fun all over the ottoman. It was time to recover an ottoman in new fabric. More durable fabric.
Watch How to Reupholster an Ottoman

How to Reupholster a Tufted Ottoman
It’s been on my list for several years to reupholster the tufted ottoman with buttons and new fabric, and it makes me a little sad everyday to see the serving trays that I use to cover the worst of the stains.
Reupholstering an ottoman is a fairly easy DIY project. It takes a long afternoon, if you have all of the supplies on hand and uninterrupted time from other responsibilities.

Supplies needed to reupholster a tufted ottoman, like this one, include:
Fabric.
Buy enough fabric to cover the ottoman on top and around the sides in one piece. Specifically, you’ll need an additional square foot of fabric for the buttons. And don’t settle for the cheapest fabric. Look for the best upholstery fabric you can get for your budget.
Plus it might be nice to buy an extra 1/2 yard to make a few matching pillows for the sofa or chairs in the room, or adjoining room to pull the color through your home. Plus, I used muslin for the interior backing.
Tools.
Scissors, fabric button kit, multi-tool, pliers, upholstery (long) needle, twine, upholstery stapler, screwdriver.
The DIY project is fairly straightforward. First, take the fabric top off of the bottom ottoman frame, remove the buttons, and then recover and reattach the buttons and the top to the frame.
Here’s how I reupholstered a tufted ottoman in denim fabric.


Watch How to Reupholster a Tufted Ottoman


How did you know where the holes were on the new fabric to reattach the buttons? I have this same ottoman in wanting to redo. Thanks!
Hi Heather!
I used the holes on the underside of the ottoman as the guide where to put the new covered buttons. The long needles allowed me to got right through it.
Hope this helps. 🙂