Want to build a straight fence line? Learn how we line up fence posts straight with our handy step-by-step guide to how to layout fence posts, how to set fence posts, and how to install fence posts. From string lines and stretchers to keep posts in place while pouring concrete, you’ll be ready to build that fence you want.
Among the many reasons I like to build a fence with wood is that I can line up the fence posts straight, and can count on those posts staying straight and standing solid in the ground. Here’s how I line up fence posts.
What’s in this article about how to line up fence posts and how to set fence posts?
We’ve included step-by-step instructions, including essential tools and tips, so that you will know how to install fence posts straight and have the fence line you want.

How to set fence posts in a straight line.
From getting started with layout and pulling a string to learning how to set fence posts, how to line up fence posts, and how to set fence posts, we’ve got the playbook you need to get the job done right.
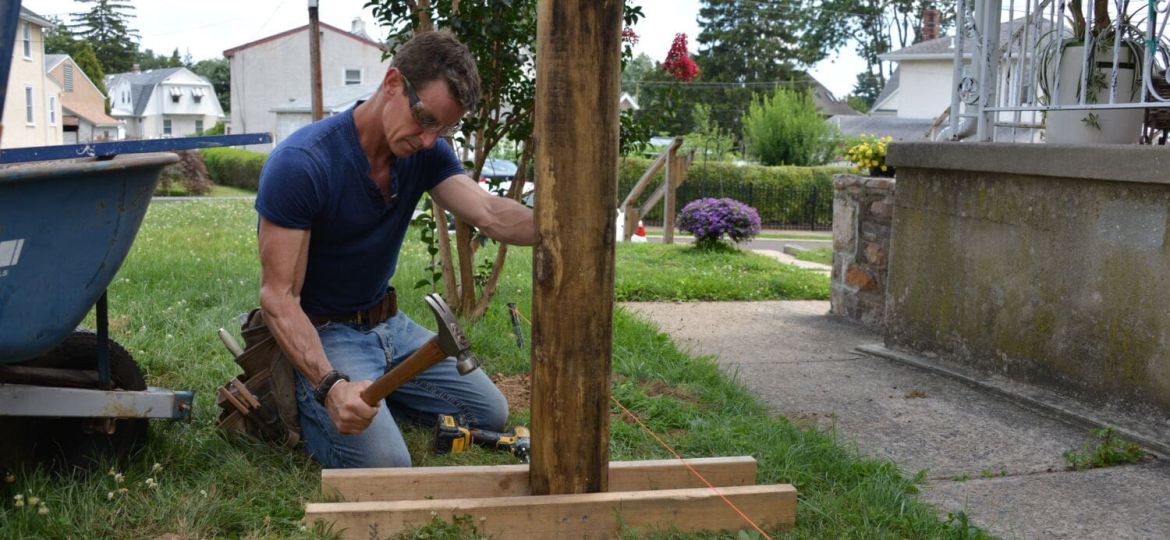
Step 1. Pulling a string
The first step to installing fence posts straight involves pulling string. The string is really called ‘mason’s line.’ Pulling it tight between the two points where the posts will go is the best way to build a fence straight and true. The longer the run, the tighter the string needs to be to stay straight.
I use a knot called a trucker’s hitch to get it tight and keep it taught (VIDEO: How to tie a trucker’s hitch).

The downside to a string is that it is 100% in the way about 100% of the time. It’s what strings do. It’s not their fault.
To hold it out of the way to dig a hole for example, I pull it to the side, sink my scratch awl into the ground and then hook the string on it.

Step 2. Set the location of the first and last fence posts.
I start every fence I build by determining the locations of the first and last posts in each run. On a square or rectangular yard, for example, this is usually the corners of the property. I set those posts first.

Step 3. Dig in.
Where I live in Pennsylvania, posts should be no less than 36 inches deep. This is to protect the post and structure from everything from frost to bearing-up in bad weather like snow storms and high winds.
I pour a few inches of pea gravel at the base of the hole to give ground water a place to move, then pour a concrete footing around the base of the post. I usually use a fast-setting mix for end posts.

Step 4. Map the rest of the posts.
Before digging for the rest of the posts, I map out their locations. Store-bought fence panels are typically 8 feet long. However, the yard may not be equally divisible by 8.
When you build a fence—in my view, anyway—avoid a stubby little fence sections near a corner or gate. One trick is to start laying out the post locations in the center of the run. That way the end panels on each side of the yard should be suitably large to look good and be the same size as each other.
Another trick is to adjust the position of, or widen a gate so your end panels end up even.
A third approach is to get artistic. If posts stack close to each other, add a ‘decorative’ post to transition around the corner (set it like a regular post). It’s a design trick I use when reality starts to trump intention. The hack (and all good carpenters do this) is to creatively make the mistake look like it’s meant to be there.

Alternatively, you may want to center an entire panel in the middle of the run. There are lots of approaches, but the main idea is that you want the end panels to be approximately the same size as each other.
Step 5. Brace for it.
To keep posts straight in line with each while the concrete cures in the bottom of the hole I brace the bottoms of the posts and run a temporary 2×4 rail (I call it a ‘stretcher’) across the top.
Step 6. Fasten those posts.
Once the concrete is cured, I remove the stretchers, fill the hole and start installing the fence boards. Screws work better than nails for stretchers.

Before fastening stretchers, I give them some solid slams into soft ground to help them stay still.

Note about dry concrete in the hole
Fence companies are notorious for pouring dry concrete in the hole then assuming ground water will eventually soak it and cause it to cure. While this may be true, it still takes a long time. And in the meantime, wind storms, super cells, even large dogs...whatever…can wreak havoc on under-supported fence posts.
I always mix and pour concrete then let it cure overnight before back-filling the hole.

The result is a rockin’ set of super-straight and awesomely plumb fence posts and a fence line that stands tall and please the eye for years to come.
If this article about how to line up fence posts and set fence posts in a straight line has left you with more questions about how to install fence posts or how to set fence posts, send us a note. We’re happy to help.
Watch How to Make a Straight Fence Line with String.

Check Out the How to Build a Fence Video

If you have questions about this project or another home improvement project, send us a note.


I am so happy with all that you have achieved. You have such an impressive funny bone.
Breathing in and out a number of times a day boosts your life profoundly.
Obtain the results you want with less initiative, very simple.
Saved as a favorite, I like your site!
thank you very nice.
This site truly has all the information and facts I needed concerning this subject and didnít know who to ask.
Great goods from you, man. I actually like what you have got here. This is actually a great web site.|
That is a very good tip
I couldn’t refrain from commenting. Perfectly written!
Building a good fence has a lot more to it than I originally thought. I would have a hard time getting the holes all the same depth. It does seem like it would be smart to have a professional do this for you.